Add Columns to the Planning List
Customize the planning list by showing different columns. By default, when you open the planning for the first time, the columns Name, Duration, and % Done are displayed.
Add Columns
To add columns to the planning list:
- Click New column to the right of the existing columns.
- A dropdown menu opens where you can select the columns you want to display.
- You can adjust the column order using drag and drop. Simply drag a column to the desired position while holding down the mouse button.
Alternatively, right-click in one of the columns and then click Columns to choose which columns to show or hide. Check or uncheck the checkbox next to each column name.
The column view will be applied to all your projects.
Custom Fields as Columns
If you have defined custom fields, you can display those created for planning or tasks as columns (available since InLoox 11.11). These columns function as typed editors for the custom fields — for example, dropdowns can be selected from, and checkboxes can be toggled.
Only custom fields defined for planning or tasks can be displayed as columns. Learn how to create them in the custom fields help article.
Planning List: Column Descriptions
The following overview describes each column available in the planning list:
| Column | Description |
|---|---|
| # | Displays the number of the planning element |
| WBS Code | Shows the work breakdown structure code |
| WBS Code (Manual) | Shows the manually entered WBS code |
| Start | Shows the start date of the planning element |
| End | Shows the end date of the planning element |
| Info | Shows a pin icon when a constraint exists (except "As soon as possible"). Hover over the pin to see the constraint type and date. Also shows an orange clock icon when an item is overdue |
| Location | Displays the manually entered location of a planning element |
| Duration | Shows the duration between start and end date in work days (d) |
| Calendar | Shows the selected calendar (Standard, 24/7, Weekend, or custom) |
| Effort | Shows the time in hours (h) allocated to the task and the accumulated time for the planning element based on assigned tasks |
| Resources | Shows the name of the assigned resource |
| Constraint Type | Shows the type of constraint between planning elements (e.g., Start-to-Finish) |
| Constraint Date | Shows the date selected with the constraint |
| Successor | Shows the succeeding planning element if a dependency exists |
| Predecessor | Shows the preceding planning element if a dependency exists |
| Slack | Shows the time difference in days between planning elements |
| % Done | Indicates the percentage of completion |
| Done Date | Indicates when the planning element was marked as done |
To ensure consistent labeling between InLoox Web App and InLoox for Windows/Outlook, some labels were harmonized in InLoox 11.4.2:
- Effort = Effort of the task or summarized effort of subordinate tasks
- Duration (formerly Work Duration) = Planned duration of the activity in work days
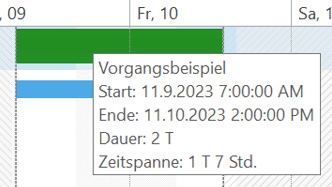
- Timespan (formerly Duration) = Effective duration including non-working time, calculated based on the defined working time calendar
Before InLoox 11.4.2:

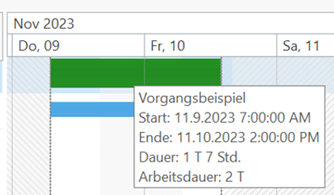
Since InLoox 11.4.2: