Email Tracking
The integration of Outlook in InLoox makes it easy to turn emails into tasks or documents and file attachments in InLoox projects — without leaving the platform.
If you are still using InLoox Self-Hosted Edition 12.5.1 or earlier, this functionality is under Track. See the Track (InLoox 12) help article.
Prerequisites for Emails
- Connect your Microsoft 365 account
- Show inbox in InLoox — to display your Outlook inbox in InLoox
Optional Outlook email permissions:
- Automatically transfer emails from same conversation to project — auto-assigns conversation emails to the project
- Use SharePoint Online or Teams for document storage — syncs emails and attachments with SharePoint
- Activate full access to SharePoint sites — required for dynamically creating document libraries
Optional permissions for flagged emails:
- Create tasks from flagged emails — auto-creates tasks from flagged emails
- Update flags in emails — syncs flags between InLoox and Outlook
Overview: Email in InLoox
![]()
Searching Outlook Folders and Emails
- Click Email in the menu.
- Search folders and emails using the search fields.
Displaying All, Unread, Tracked, and Untracked Emails
Use the tabs All, Unread, Tracked, and Untracked to filter your inbox view.
Marking Emails and Archiving
- Mark emails as read or unread.
- Archive emails to keep your inbox organized.
Refreshing the Connection
Click the Refresh button to update the email list with the latest messages from Outlook.
Adjusting the View
Resize the folder pane, email list, and preview areas by dragging the dividers between them.
Turn an Email into an InLoox Task
- Microsoft 365 connection active
- Permission Show inbox in InLoox enabled
- InLoox AI Assistant activated
This feature requires enabling the InLoox AI Agent under InLoox Account Settings >> Organization >> Privacy Settings. Not available in Self-Hosted edition.
- Select an email from the inbox.
- Click Identify Tasks. The AI Assistant analyzes the email content and suggests tasks.
- Click OK next to a suggested task to open and edit it.
- For multiple tasks in the same email, click Identify Tasks again to process additional suggestions.
![]()
File an Email or Attachment as a Document
- Microsoft 365 connection active
- Permission Show inbox in InLoox enabled
Optional:
- Automatically transfer emails from same conversation to project — to auto-track related emails
- Use SharePoint Online or Teams for document storage — to sync with SharePoint
- Select an email from the inbox.
- Click File to Project in the toolbar.
- Select the target project from the list.
- Choose a document category (optional).
- Select the file format: EML or PDF.
- To file an attachment, expand the email and select the attachment.
- Click File to Project for the selected attachment.
- Choose the target project and category.
- Confirm the filing action.
- The email or attachment appears in the project's Documents section.
Emails filed as PDFs cannot be automatically tracked. Automatic tracking only works with the .eml format.
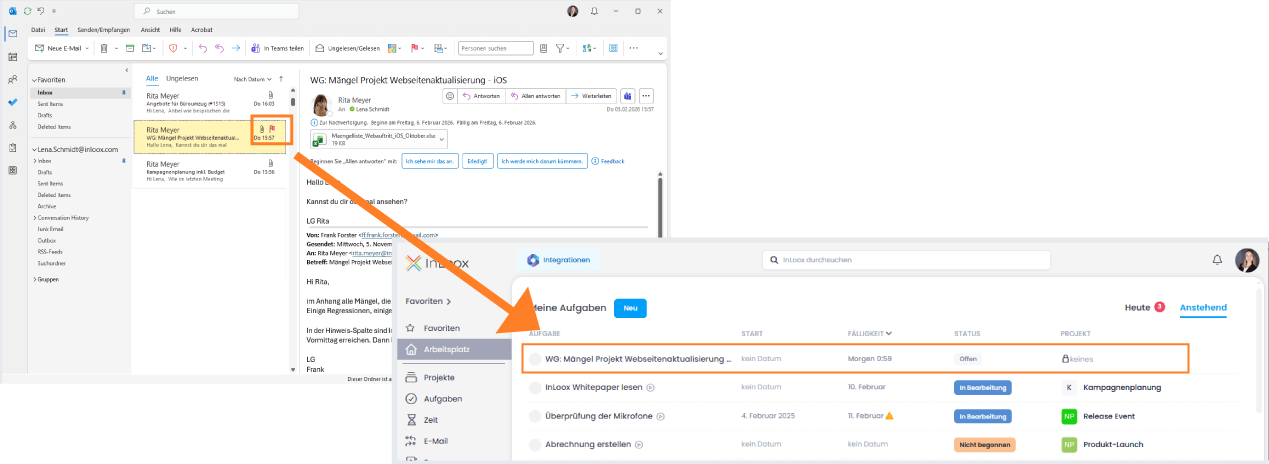
Flag Emails in Outlook to Create InLoox Tasks
- Microsoft 365 connection active
- Show inbox in InLoox enabled
- Create tasks from flagged emails enabled
- Optional: Update flags in emails enabled — to sync flag status between InLoox and Outlook
- Open Outlook and flag an email.
- InLoox detects the flagged email and creates a new task automatically.
- The task title is set to the email subject.
- Open the task in InLoox to edit details such as assignee, due date, and project.
- If Update flags in emails is enabled, completing the task in InLoox removes the flag in Outlook (and vice versa).